I spent a while thinking about various solutions, and was trying to work out some kind of lever feed arrangement. But it dawned on me that for small holes not much pressure is needed so maybe the lever was not necessary. I also had a small attachment for my big mill that lets you feed the drill down by holding a small disk.
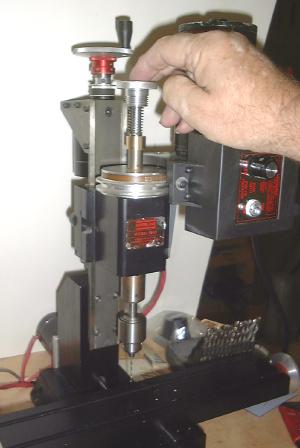
The first photo shows my driling attachment in use. Note the top is a simple disk with a bearing in it. To drill a hole you just press down on the disk, feeding the drill against a small spring. When released the spring pulls the drill back up.

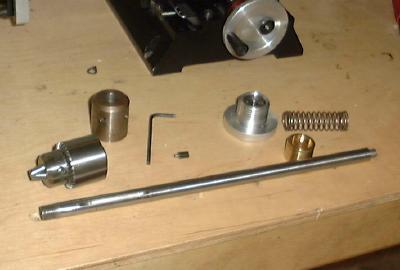
The next photo shows the parts of this unit spread out.

I used the standard Sherline 3/8" mill older as the base. It screws on the spindle in the normal way and is not modifed at all.
I made a 3/8" dia shaft about 9" long. The bottom end of the shaft is threaded to fit the dril chuck. My chuck is 3/8-24 thread, so the rod was exactly the right size to thread. It would be better if there were a shoulder on the end for the chuck to seat on, but then the rod would have to be installed from the bottom up, and that would be a pain. A simple thread on the end is not the best seating for the chuck, but I used a thread cutting setup, not a die to make the thread, so it runs true.
The rod has a keyway milled into it about 2" long, .092 wide. about 1" up from the bottom. I used a woodruff key cutter in the vertical mill to make this cut.
I took the set screw that holds the endmill into the holder, and cut its end into a cylinder, .092 dia. This screw goes through the mill holder and rides in the slot in the rod, to drive the rod, but let it move up and down.
I made a simple bushing to keep the rod centered on the top of the spindle. It has a .562 bore in its bottom to fit over the end of the spindle, and a .375 reamed hole to guide the rod.
I found a spring about 1/2" dia and 2 1/2" long to go over the bushing,
The disk on top was in my junk drawer. Its simply an aluminum disk about 1 1/2" dia with a ball beairng in it. I turned a spigot on the end of the rod to suit the ball beairng. This disk can be left attached to the rod. The threads seen in the photo were just part of the piece I found, they are not necessary.
To set up for driling, simply screw the mill holder onto the spindle nose, put the spring and bushing on the rod, and drop it down the spindle hole. Align the slot with the mill screw and insert the set screw, being sure it rides in the slott and does not lock the rod from moving. Finaly, screw on the chuck.
It ony took me an hour to make all these pieces- I was lucky to have the disk in my junk, but that would only take a few more minutes to make. This should make drilling holes a lot more pleasant on the Sherline.