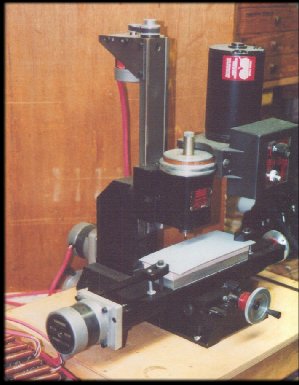
Here are two photos of my conversion. Note that I have taken an unusual approach and mounted the step motors on the ends of the lead screw opposite the normal hand crank. This provides several very important benefits- the handwheel is unaffected, so when the motors are powered off you can operate the mill in the normal way. This is very usefull for setup and locating work under the tool.
It also leaves the normal lead screw thrust bearings untouched. This means the step motors only turn the shafts, no thrust is applied to them. It also means you can use single shaft motors instead of double, which are very often easier to get and cheaper on the surplus market.
Note how I "tunnelled' under the base of the vertical column. I simply drilled a 1/2" hole thru the column, then saw cut the bottom out to make the tunel shape.
I connected the lead screw to the motor by a simple coupling. This is nothing more than a rod, threaded on one end to mate to the lead screw, and bored on the other to be a shaft coupling on the motor. A set screw fixes it to the motor shaft.
I have also played with the package from MAXNC. Its a bit simplistic, but it does take Gcode data and run the mill. I later bought CNCPro and have had very good results with it, but it appears it is no longer offered for sale.
I also replaced the brass leadscrew nuts with cast in place Moglice. Moglice is an epoxy product made for macine repair. The nuts are working perfectly- I have ZERO backlash and lower drag than the brass nuts. I think this is a nice solution for a Sherline where fitting ball screws would be very hard.
Update, December 2004 Several people have asked how I did the Moglice, so here is a brief description. The Moglice is thin enough to be injected from a plastic syringe. To hold the scews in place while its being injected I used the standard Sherline nuts. Each axis has two nuts- one is a cylinder, held into the saddle with a set screw from the top of the saddle. The other is the backlash adjuster nut, with the star wheel head, that you see on the exterior of the saddle.
Remove both nuts and clean them and the leadscrew well. Spray them well with mold release agent. I put one nut in each end of the drilled hole, and fed the leadscrew in through them. I used some plumbers putty around the thread where it exits from the nut to seal off any leaks. I injected the epoxy through the hole that normally holds the nut in place. To allow the air to escape while the epoxy is injecting I backed out one of the nuts slightly. When the epoxy gets near to filling the hole I screwed the nut back down. The nuts serve to hold the screw in the exact alignment with the saddle while the epoxy cures.
When its cured you can unscrew the lead screw and then remove the two brass nuts.
If the fit is a little to tight you can lap it out a bit. I used Bon Ami (a kitchen cleaner that is a very mild abrasive) that washes away with water. Slather some on the screw and run it back and forth with a power drill until its just a nice smooth fit.
These have held up in my hobby shop use for several years now. I did the same thing to my Prazi mill.